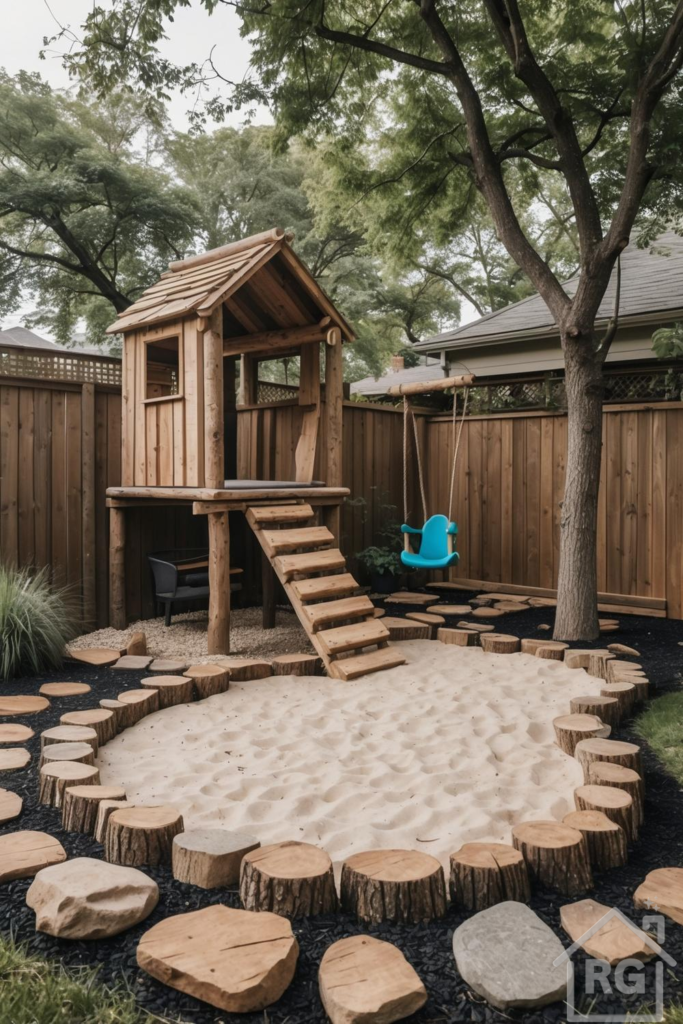
Imagine a backyard that sparks endless imagination, encourages active play, and connects children with the beauty of the natural world. The image of a charming wooden playhouse nestled among trees, a welcoming sandbox bordered by rustic logs, and a bright swing promising joyful afternoons is more than just a dream—it’s an achievable project that can transform your outdoor space into a beloved haven for your little ones. This guide will walk you through the key elements and considerations for creating your own natural adventure playground, focusing on durable materials, safe design, and fostering a love for the outdoors.
The Heart of Adventure: The Wooden Playhouse
A playhouse is often the centerpiece of any kid-friendly backyard, a magical fort limited only by imagination. Choosing the right materials and design is crucial for longevity and safety.
Why Wood?
Wood offers a timeless, natural aesthetic that blends seamlessly into outdoor environments. It’s also relatively easy to work with for DIY projects and can be incredibly durable if properly maintained.
- Cedar or Redwood: These woods are naturally resistant to rot, decay, and insect infestations, making them excellent choices for outdoor structures. They carry a higher price tag but offer superior longevity and a pleasant aroma.
- Pressure-Treated Pine: A more budget-friendly option, pressure-treated pine is chemically treated to resist rot and insects. It’s essential to use high-quality, non-toxic sealants, especially for children’s play equipment, and ensure it’s rated for ground contact if applicable.
DIY vs. Pre-Built Kits
You can build a playhouse from scratch for ultimate customization or opt for a pre-built kit.
- DIY: Offers complete control over design and materials. It can be more cost-effective if you have the skills and tools, but it’s a significant time investment.
- Kits: Simplify the process with pre-cut pieces and instructions. Quality and complexity vary widely, so research thoroughly.
Essential Design & Safety Features:
- Elevation: An elevated playhouse, like the one pictured, adds an element of adventure and creates a sheltered space underneath. Ensure the support posts are securely anchored.
- Stairs/Ladder: Steps should be sturdy, with non-slip treads and an appropriate angle for young children. Handrails are a must.
- Railings: Porches and elevated platforms need secure railings at a safe height (typically 36-42 inches) with balusters spaced no more than 4 inches apart to prevent falls and entrapment.
- Windows & Openings: Provide good visibility for supervision and ensure openings are not head entrapment hazards.
- Roof: A solid roof, whether shingled or made of wooden slats, protects from sun and rain.
- Smooth Surfaces: All wooden surfaces should be sanded smooth to prevent splinters. Round sharp edges and corners.
Crafting the Perfect Sandbox
A sandbox is a classic play feature that offers hours of sensory and imaginative fun.
Defining the Boundary
The pictured sandbox uses charming log rounds for its border, enhancing the natural theme.
- Log Rounds: Source these from local tree services (ensure the wood is untreated and safe), or cut them yourself from fallen logs. Sand the top edges smooth and consider sealing the ends that contact the ground to slow decay.
- Alternative Borders: Landscape timbers, large stones, recycled plastic edging, or even raised garden bed kits can also define a sandbox.
Choosing the Right Sand
Opt for commercially available play sand. This sand is specifically washed and screened to remove impurities and ensure it’s safe for children. Avoid builder’s sand, which can contain fine silica dust and other contaminants. Aim for a depth of at least 12-18 inches to allow for satisfying digging.
Drainage is Key
A waterlogged sandbox is no fun. Ensure proper drainage:
- Create a slight slope in the base of the sandbox area.
- Lay down a permeable landscape or weed barrier fabric at the bottom. This allows water to drain while preventing weeds and keeping the sand separate from the soil.
- For areas with very poor drainage, a shallow layer of pea gravel beneath the fabric can help.
Keeping it Clean
A sandbox cover is essential to keep out rain, debris, and neighborhood animals (especially cats). A simple tarp secured with weights, or a custom-built wooden lid, will do the trick.
Adding a Swing for Joyful Movement
A swing adds a dynamic element to the play area. The bright blue swing in the image provides a lovely pop of color.
Types and Materials
Choose a swing appropriate for the age of the children who will use it. Classic belt swings, toddler swings with safety harnesses, disc swings, or tire swings are all popular options. Ensure materials like plastic, wood, or rubber for the seat and weather-resistant rope or chains are durable and strong.
Safe Installation
- Support Structure: Swings can be hung from a sturdy, healthy tree branch (at least 8-10 inches in diameter, inspect regularly) or a dedicated A-frame swing set. Ensure the structure is robust and well-anchored.
- Clearance: Provide ample clear space around the swing’s full range of motion – at least 6 feet in front and behind, and 4-5 feet to the sides.
- Impact Attenuation: The ground surface beneath and around the swing should be soft to cushion falls. Options include at least 9-12 inches of wood chips, shredded rubber mulch, sand, or pea gravel. Grass is not ideal as it wears down quickly and offers little protection.
Natural Landscaping: Borders, Mulch, and Paths
The surrounding landscape ties the play elements together and enhances the natural feel.
Log Round Accents
Beyond the sandbox border, log rounds can be used as charming, informal stepping stones or to edge garden beds, as seen in the foreground of the image.
The Role of Mulch
The dark mulch used in the image provides a beautiful contrast to the light-colored sand and wood. Mulch offers several benefits:
- Aesthetic: Creates a tidy, unified look.
- Weed Suppression: Reduces garden maintenance.
- Moisture Retention: Helps keep soil moist for plants.
- Safety Surface: Can provide cushioning in play areas.
- Types:
- Wood Chips/Bark Mulch: Natural, decomposes over time adding organic matter to the soil. Cedar or cypress mulch can also help deter insects.
- Rubber Mulch: Made from recycled tires, very durable, excellent impact attenuation for play areas. Available in various colors.
- Pea Gravel: Offers good drainage and a different texture, but can be scattered easily.
Planting for a Lush and Safe Environment
Plants soften the hardscape elements and bring life to the playground.
Leverage Existing Trees
Mature trees, like those in the background, provide invaluable shade, a sense of enclosure, and a connection to nature. If you have them, protect their root zones during construction and prune any dead or hazardous branches.
Choosing New Plants
- Trees: If planting new trees, consider their mature size, root system (avoid invasive roots near structures), and whether they are deciduous (lose leaves in winter, allowing more sun) or evergreen. Native species are often the most resilient and beneficial for local wildlife.
- Shrubs and Ornamental Grasses: The image shows ornamental grasses, which add lovely texture, movement, and are generally low-maintenance. Good choices might include Feather Reed Grass, Switchgrass, or Little Bluestem, depending on your climate. Low-growing, non-thorny shrubs can create soft borders.
- Climate Considerations: Always select plants appropriate for your USDA hardiness zone and local conditions (sun exposure, soil type, rainfall).
Plant Safety is Paramount
This cannot be stressed enough for children’s play areas:
- AVOID TOXIC PLANTS: Many common garden plants are poisonous if ingested. Research every plant before including it. Examples of plants to avoid include oleander, foxglove, castor bean, yew, and lily of the valley. Consult local extension offices or reliable botanical resources.
- Avoid Thorny or Spiky Plants: Keep roses, barberry, yucca, or cacti away from active play zones.
- Consider Allergies: Be mindful of plants known to cause severe allergies.
The Backdrop: Fencing for Privacy and Definition
A fence, like the wooden privacy fence shown, defines the play area, offers security, and provides a neat backdrop.
- Wooden Fencing: Vertical board fences are classic and effective. Cedar, redwood, or treated pine are common materials. Regular staining or sealing will prolong its life.
- Alternatives: Vinyl or composite fencing offer lower maintenance. A living fence (dense hedge) can also provide a beautiful, natural boundary.
DIY Touches and Personalization
Make the space uniquely yours and even more engaging:
- Playhouse Decor: Let kids help paint or decorate the playhouse with stencils, flags, or window boxes for flowers.
- Mud Kitchen: A simple DIY mud kitchen made from old pallets, wood scraps, and thrifted bowls can provide hours of messy fun.
- Outdoor Chalkboard: Attach a large piece of exterior-grade chalkboard to a fence or the side of the playhouse.
- Nature Art Station: A small table or designated area for collecting and creating with leaves, stones, twigs, and other natural finds.
Maintaining Your Natural Playscape
Regular maintenance ensures the playground remains safe and enjoyable for years.
- Safety Checks: Regularly inspect the playhouse, swing, and other structures for loose hardware, splinters, rot, or instability.
- Wood Care: Re-seal or re-stain wooden elements every few years to protect against weather.
- Sandbox Upkeep: Rake the sand regularly to remove debris and aerate it. Refresh or replace sand annually. Always keep it covered when not in use.
- Mulch Top-Up: Organic mulches will decompose, so top them up every year or two.
- Plant Care: Prune plants as needed, especially to maintain clear pathways and remove any hazardous branches. Water according to plant needs.
Creating the Perfect Ambiance
The overall feel of the space contributes significantly to its appeal.
- Natural Color Palette: The dominant earthy tones of wood, sand, and green foliage create a calming and inviting atmosphere.
- Pops of Color: The bright blue swing adds a playful, eye-catching accent. Consider similar small, vibrant touches with accessories like cushions, planters, or painted elements.
- Encourage Imaginative Play: The design itself—a house, a sandpit, a swing—naturally invites storytelling and adventure. Avoid cluttering the space with too many prescribed toys; allow room for imagination to flourish.
- Sensory Engagement: Incorporate varied textures (smooth sand, rough bark, soft leaves, cool stones) and consider elements that engage other senses, like fragrant herbs or wind chimes (placed safely).
Your Backyard Adventure Awaits
Creating a natural adventure playground is a rewarding project that provides immense benefits for children’s physical activity, creativity, and appreciation for the outdoors. By thoughtfully selecting materials, prioritizing safety, and incorporating natural elements, you can build a space that will be the source of cherished memories for years to come. Start planning your dream backyard play area today, and watch the magic unfold!