There’s an undeniable charm in bringing the tranquility of the natural world indoors. Few decor elements achieve this as gracefully as pressed botanical art. Imagine a wall adorned with delicate, preserved flowers and ferns, each piece a tiny window into nature’s exquisite beauty. This guide will walk you through the process of creating your own serene botanical gallery wall, transforming a simple space into a captivating display of natural elegance.
The Allure of a Botanical Gallery Wall
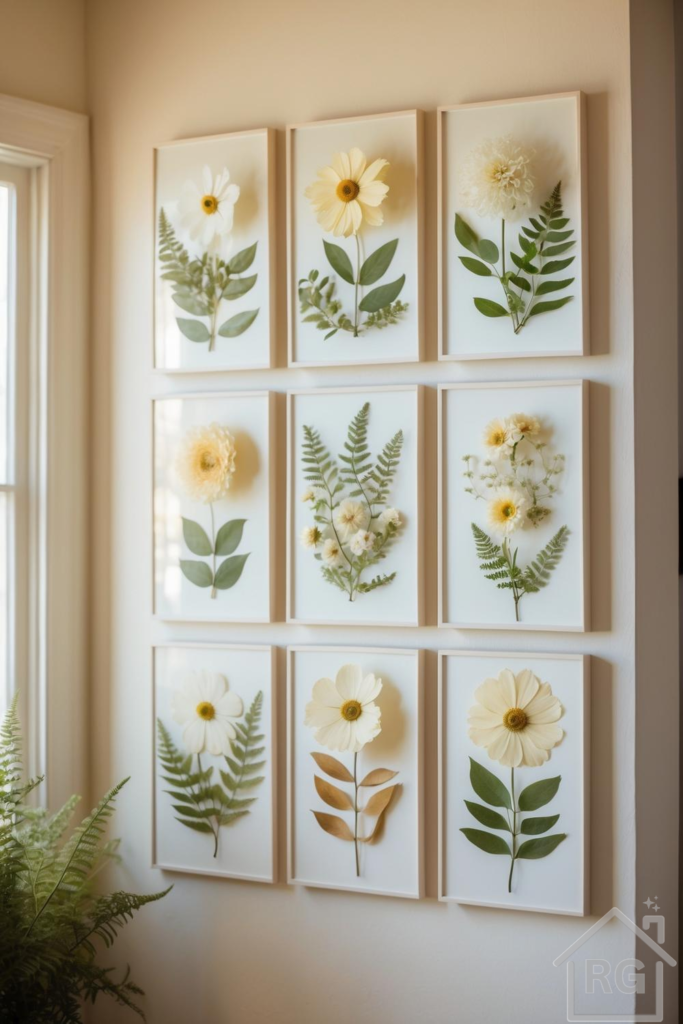
The image before us showcases a stunning example of a botanical gallery wall, a curated collection of nine framed pressed botanicals arranged in a perfect grid. This particular display exudes a sense of calm and timelessness, making it an ideal addition to a variety of interior styles, from modern farmhouse to Scandinavian, or even a classic traditional home seeking a touch of organic charm.
Key Elements of This Aesthetic:
- A Harmonious Color Palette: The dominant colors are soft and soothing. The walls are a gentle, warm cream, providing a perfect neutral backdrop. The pressed flowers themselves feature shades of creamy white and buttery yellow, offering a subtle warmth. These are beautifully complemented by various tones of fresh green from the leaves and ferns, and hints of warm, earthy brown from dried elements. This palette is inherently calming and allows the intricate details of the botanicals to truly shine.
- Delicate Textures: The beauty lies in the interplay of textures. You have the smooth, painted surface of the wall, the clean lines and subtle grain of the light wooden frames, and the reflective quality of the glass. But the true stars are the delicate, papery textures of the pressed flowers and the intricate, almost lace-like patterns of the ferns. These natural textures add depth and organic interest without overwhelming the senses.
- Thoughtful Arrangement: The gallery wall is meticulously arranged in a symmetrical grid, creating a sense of order and balance. Each frame is identical in size and style, contributing to the cohesive and polished look. This uniformity allows the individual beauty of each botanical piece to be appreciated while also forming a powerful collective statement.
- Natural Light Integration: Positioned near a window, the artwork benefits from abundant natural light, which enhances the colors and highlights the delicate details of the pressed specimens. The presence of a live fern plant nearby further blur the lines between indoor and outdoor, reinforcing the natural theme.
Achieving the Look: Your Step-by-Step Guide
Recreating this serene botanical gallery wall is a rewarding project that combines artistry with a love for nature. Here’s how you can achieve a similar aesthetic in your own home:
1. Curating Your Botanical Specimens
The foundation of your gallery wall is, of course, the botanicals themselves. Look for flowers and foliage that press well and retain their color. Ideal choices include:
- Flowers: Daisies, cosmos, pansies, violas, small roses, hydrangeas (individual petals), delphiniums, and even wildflowers. Choose flowers that aren’t too thick or fleshy, as these can be difficult to press evenly and may mold. The image features beautiful white and pale yellow varieties, suggesting a preference for lighter, airier blooms.
- Foliage: Ferns (especially delicate varieties like maidenhair or lace ferns), various small leaves (e.g., maple, oak, ginkgo), and sprigs of herbs like rosemary or lavender. The ferns in the example are particularly striking, adding a lush, verdant element.
Tip: Collect specimens on a dry day, ideally in the late morning after dew has evaporated. Avoid bruised or damaged specimens. For a cohesive look, consider collecting varieties that share a similar color family or form, as seen with the predominantly white, yellow, and green palette in the example.
2. The Art of Pressing Flowers
There are several methods for pressing flowers, each with its own advantages:
- Traditional Flower Press: This is the most effective method for achieving flat, well-preserved specimens. Layer your botanicals between sheets of absorbent paper (blotting paper, newspaper, or plain white paper) and cardboard, then tighten the press.
- Heavy Books: A simple and accessible method. Place your flowers between sheets of absorbent paper within the pages of a heavy book. Stack more books on top for added weight.
- Microwave Press: For quicker results, specialized microwave presses can dry flowers in minutes, though they require careful monitoring to prevent scorching.
Regardless of the method, ensure your flowers are completely dry before framing, which can take 2-4 weeks for traditional pressing. Patience is key to preventing mold and preserving vibrant colors.
3. Designing Your Layout and Framing
The cohesive look of the example gallery wall comes from its uniform framing and precise arrangement.
- Frames: Opt for simple, clean-lined frames. The light wood frames in the image provide a natural, understated elegance that doesn’t detract from the botanicals. White or off-white matting is crucial as it creates a clean border, making the pressed art pop and giving each piece breathing room. Consider frames with UV-protective glass to prevent fading over time.
- Matting: A crisp white or cream mat board will highlight your pressed specimens beautifully. Ensure the opening of the mat is appropriately sized for your botanical arrangement.
- Layout Planning: Before hanging, plan your gallery wall layout on the floor. Arrange your nine (or more/fewer) frames in a grid. Measure the exact spacing you desire between each frame. The example uses a consistent, relatively narrow gap, contributing to its neat appearance. Use painter’s tape or craft paper cutouts on the wall to visualize the arrangement before making any holes.
4. Assembling Your Botanical Masterpieces
- Carefully arrange your pressed flowers and leaves on the backing board or directly onto the mat board. Experiment with different compositions – a single prominent flower, a cluster of smaller blooms, or a mix of flowers and ferns, as seen in the example.
- Use a tiny dot of clear craft glue or archival adhesive strips to secure the botanicals in place. Be very gentle, as pressed flowers are fragile.
- Carefully place the glass over your arrangement and seal the frame.
Integrating Your Botanical Gallery Wall into Your Home
A botanical gallery wall is incredibly versatile and can enhance various rooms:
- Living Room: As a focal point above a sofa or console table, it brings a calming, natural element to your main gathering space.
- Bedroom: The serene nature of pressed flowers makes them perfect for a bedroom, promoting relaxation and a peaceful atmosphere.
- Entryway: Create a welcoming first impression with a touch of natural beauty.
- Dining Room: Add an elegant, organic touch to your dining area, perfect for intimate meals.
- Home Office: Bring a sense of calm and connection to nature into your workspace, fostering creativity and focus.
Complementary Decor and Styling:
- Natural Materials: Incorporate other elements like light wood furniture, linen textiles, ceramic vases, and woven baskets.
- Live Plants: As seen in the image, a lush live fern or other houseplants will beautifully complement the pressed art, reinforcing the biophilic design.
- Soft Lighting: Ensure the area is well-lit, preferably with natural light. If artificial lighting is needed, opt for warm, diffused light that doesn’t cast harsh shadows.
- Minimalist Approach: Let the artwork be the star. Avoid cluttering the surrounding space with too many competing decor items.
The Enduring Appeal of Pressed Botanical Art
Beyond their aesthetic appeal, pressed botanical art pieces offer several benefits:
- Connection to Nature: They provide a constant, gentle reminder of the beauty of the natural world, even when you’re indoors.
- Unique and Personal: If you press your own flowers, each piece tells a story – perhaps from a special garden, a memorable walk, or a significant event.
- Sustainable Decor: It’s a wonderful way to preserve the fleeting beauty of flowers and create lasting decor from natural elements.
- Calming Influence: The soft colors, organic forms, and delicate nature of these pieces contribute to a peaceful and tranquil environment.
Care and Maintenance
To ensure your pressed botanical art remains beautiful for years to come:
- Avoid Direct Sunlight: While natural light is good, prolonged direct sunlight can cause colors to fade over time. Position your gallery wall where it receives ample ambient light but is not constantly bathed in harsh direct rays.
- Dust Gently: Dust the frames and glass regularly with a soft, dry cloth.
- Humidity Control: Keep the art in an environment with stable humidity levels to prevent moisture damage or brittleness.
Embrace the quiet elegance of pressed botanical art and transform your wall into a testament to nature’s enduring charm. This project is not just about decorating a space; it’s about creating a personal connection to the world around us, one delicate petal and leaf at a time. Start collecting, start pressing, and watch your serene botanical gallery wall come to life.