Designing Your Dream Kitchen Wine Nook: A Blend of Style and Practicality
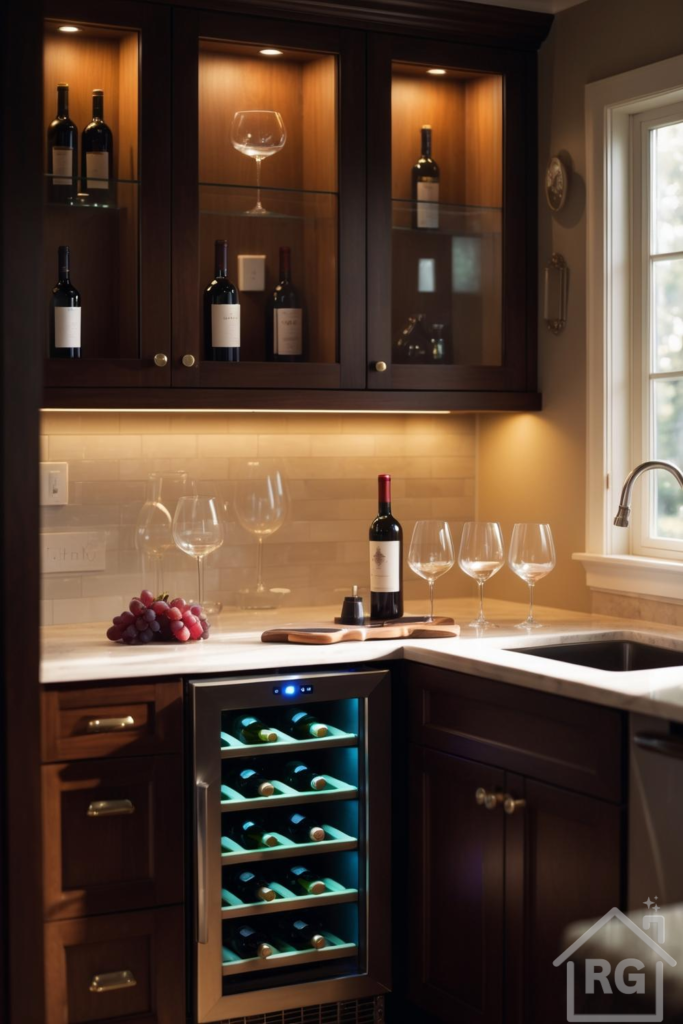
For wine enthusiasts, integrating a dedicated space for storing, chilling, and serving wine within the kitchen is the ultimate luxury. A well-designed wine nook not only adds significant functionality but also elevates the aesthetic appeal of your culinary space, creating a sophisticated focal point. As seen in the featured image, a successful wine nook seamlessly blends storage, cooling technology, and display elements within the existing kitchen layout. This corner setup utilizes dark wood cabinetry, a built-in wine cooler, elegant glassware, and warm lighting to create an inviting and practical area.
Step 1: Location, Location, Location
Choosing the right spot for your wine nook is crucial. Consider these factors:
- Proximity to Entertaining Areas: Ideally, place it near your dining area or living room for easy access when hosting guests.
- Avoid Direct Sunlight & Heat Sources: Wine is sensitive to temperature fluctuations and UV light. Keep the nook away from windows without UV protection, ovens, or radiators.
- Utilize Corner Spaces: As demonstrated in the image, corners are often underutilized and can be perfect for creating a defined wine zone without disrupting kitchen workflow.
- Consider Existing Layout: Can you repurpose a section of cabinetry, a butler’s pantry, or even space under the stairs adjacent to the kitchen?
Step 2: Selecting the Right Wine Cooler
A wine cooler (or wine fridge) is often the centerpiece of the nook. Key considerations include:
- Capacity: How many bottles do you typically keep on hand? Coolers range from small countertop models to large, multi-zone units. The under-counter model shown offers substantial storage without dominating the space.
- Single vs. Dual Zone: If you store both reds and whites that require different serving temperatures, a dual-zone cooler is essential.
- Built-in vs. Freestanding: Built-in models, like the one pictured, offer a seamless, integrated look. Ensure they have front ventilation if installed under a counter. Freestanding units offer more placement flexibility.
- Features: Look for UV-protected glass doors, vibration reduction technology, adjustable shelves, and interior lighting (the blue LED lighting in the example adds a modern touch).
Step 3: Cabinetry and Storage Solutions
Beyond the cooler, effective storage is key. The design incorporates several smart solutions:
- Glass-Front Cabinets: Upper cabinets with glass doors, as shown, allow for an elegant display of glassware and perhaps a few special bottles. Interior cabinet lighting enhances this feature.
- Solid Cabinets/Drawers: Lower cabinets provide concealed storage for bar tools, accessories, extra bottles, or linens. The dark wood cabinetry lends a rich, traditional feel.
- Open Shelving (Optional): While not pictured, open shelves can offer easy access to frequently used glasses or decorative items.
- Material Consistency: Matching the nook cabinetry to the rest of the kitchen, as done here with the dark wood, creates a cohesive look. Contrasting finishes can also work if done thoughtfully.
Step 4: Countertop and Backsplash Choices
The countertop provides essential workspace for opening bottles and pouring drinks. The backsplash protects the wall and adds visual interest.
- Countertop Material: Durable and non-porous materials like quartz (likely shown), granite, or even butcher block are practical choices. Ensure it complements the main kitchen counters. The light marble-effect quartz here contrasts beautifully with the dark cabinets.
- Backsplash Design: The simple, glossy beige subway tile backsplash adds texture and reflects light without competing with other elements. Tile, stone, or even mirrored backsplashes can work well.
Step 5: Illuminating Your Nook
Lighting plays a crucial role in both function and ambiance.
- Under-Cabinet Lighting: Essential for task lighting on the countertop. The warm LED strip lighting seen here creates a welcoming glow.
- In-Cabinet Lighting: Puck lights or LED strips inside glass-front cabinets highlight your glassware collection, adding depth and sophistication.
- Dimmer Switches: Installing dimmers allows you to adjust the mood from bright and functional to soft and intimate.
Step 6: Accessorizing and Styling
The final touches bring your wine nook to life.
- Glassware: Display a selection of appropriate wine glasses (red, white, sparkling).
- Bar Tools: Keep a quality corkscrew, foil cutter, aerator, and bottle stoppers handy. Store them neatly in a drawer or a stylish container.
- Serving Essentials: A small cutting board (like the wooden one shown) for cheese or garnishes, coasters, and perhaps a decanter can be both useful and decorative.
- Decorative Touches: A small plant, a bowl of fruit (like the grapes pictured), or a piece of art can personalize the space. Keep it uncluttered.
- Hardware: Note the elegant, simple brass/gold knobs on the cabinetry, adding a touch of warmth and luxury.
Achieving the Look: Key Takeaways
This sophisticated kitchen wine nook successfully integrates functionality and style through:
- Cohesive Materials: Consistent use of dark wood cabinetry ties the nook into the kitchen.
- Smart Technology: An integrated under-counter wine cooler provides optimal storage.
- Layered Lighting: Combining under-cabinet and in-cabinet lighting creates ambiance and functionality.
- Balanced Contrast: Light countertops and backsplash contrast effectively with dark cabinets.
- Elegant Display: Glass-front cabinets showcase glassware beautifully.
By carefully planning the location, selecting the right components, and paying attention to details like lighting and accessories, you can create a stunning and practical wine nook that enhances your kitchen and your enjoyment of wine.