The Allure of Flowing Water: Bringing Nature Home
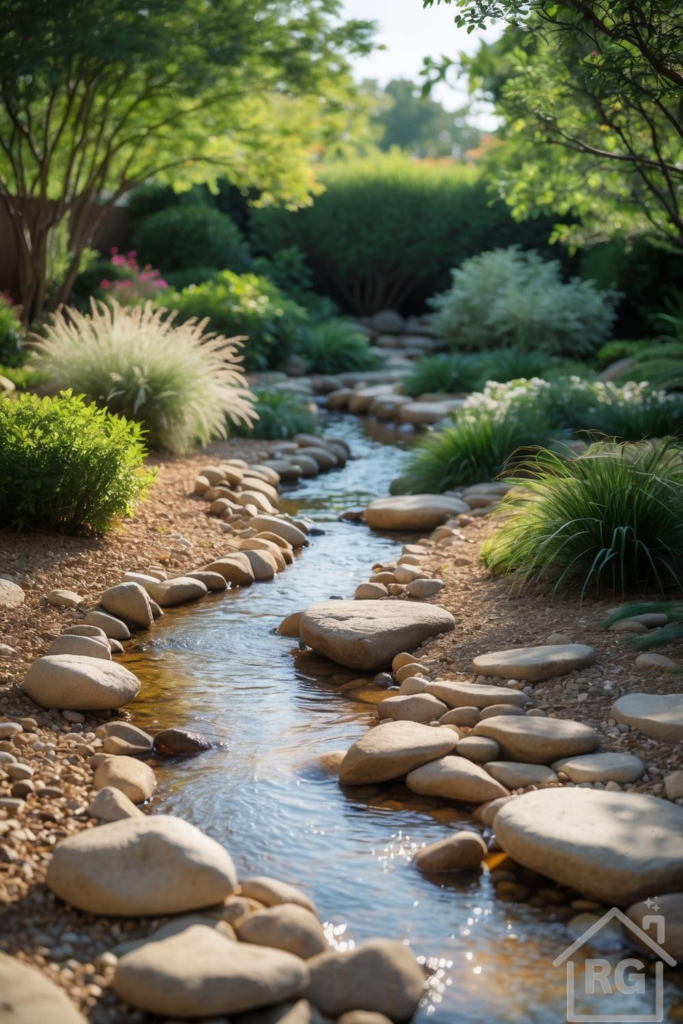
There’s something inherently calming about the gentle sound and sight of flowing water. A backyard stream, like the serene example pictured, can transform an ordinary garden into a tranquil oasis, a haven for relaxation and a magnet for local wildlife. Unlike formal fountains, a naturalistic stream blends seamlessly with the landscape, offering a dynamic focal point that changes with the seasons. This guide will walk you through the key elements of designing and incorporating a beautiful, natural-looking stream into your own outdoor space, drawing inspiration from the harmonious blend of rock, water, and planting seen here.
Step 1: Planning Your Peaceful Waterway
Before you dig, careful planning is crucial. Consider the natural contours of your yard. A gentle slope is ideal for creating a natural flow, but even relatively flat yards can accommodate a stream with some strategic excavation and berm creation. Think about:
- Location: Where will the stream be most enjoyed? Consider visibility from patios, decks, or windows. Also, think about sunlight – full sun, partial shade, or full shade will influence plant choices. Proximity to power sources for a pump is another practical consideration.
- Size and Path: How long and wide will your stream be? A meandering path, like the one shown, feels more natural than a straight line. Varying the width can also add interest. Sketch out potential paths directly on the ground using a garden hose or landscape paint.
- Source and Terminus: Where will the water originate (the source pool or waterfall) and where will it collect (the terminus pool)? These points anchor the stream visually and functionally, housing the pump and allowing water to recirculate.
Step 2: Selecting Natural Materials – The Foundation of Authenticity
The key to a natural-looking stream lies in the materials. Observe natural streams – they feature a variety of rock sizes and types. The image showcases this beautifully:
- Stream Bed Liner: While not visible, a durable, flexible pond liner (like EPDM rubber) is essential beneath the rocks to contain the water.
- Boulders and Larger Rocks: Use larger, smooth river stones or boulders, like those prominently lining the edges in the photo, to define the stream’s course and create visual weight. Place them strategically to direct water flow and create small eddies or cascades.
- Medium Rocks and Gravel: Fill the stream bed and line the banks with smaller river rocks and gravel in varying sizes (pea gravel up to 2-3 inch stones). This mix, evident in the image, creates a realistic texture, hides the liner, and provides surfaces for beneficial bacteria. Choose natural, earthy tones like browns, beiges, and greys.
- Soil and Mulch: Use good quality garden soil for planting pockets along the banks and natural mulch (like shredded bark) to blend the edges into the surrounding landscape.
Step 3: Planting for a Lush, Integrated Look
Plants soften the rockwork and integrate the stream into the garden. Choose a mix of textures, heights, and forms, focusing on species that thrive in moist conditions or tolerate occasional wet feet. The planting in the inspiration image is exemplary:
- Grasses: Ornamental grasses (like Feather Reed Grass, Switchgrass, or Carex varieties) add fine texture and movement, mimicking natural streamside vegetation. Notice the soft, feathery grasses catching the light along the banks.
- Groundcovers and Spillers: Low-growing plants like Creeping Jenny or Ajuga can spill over rocks, softening edges and filling gaps.
- Shrubs: Incorporate moisture-loving shrubs (like Dogwood, Viburnum, or Summersweet) for structure and seasonal interest. The background features well-established green shrubs providing depth.
- Perennials: Add color and texture with perennials like Hostas, Ferns, Astilbe, Irises, or Daylilies planted along the moist edges. Subtle hints of pink flowers can be seen in the background planting.
- Trees: Small, water-tolerant trees (like River Birch or Serviceberry) planted nearby can provide height, shade, and a natural canopy, as seen framing the scene.
Plant in pockets of soil tucked between rocks along the stream edge, allowing plants to naturalize and creep towards the water.
Step 4: Construction and Water Flow
While detailed construction is beyond this scope, the basic process involves excavating the stream path and pools, laying protective underlayment, installing the flexible liner, carefully placing rocks and gravel to create the desired look and hide the liner completely, and installing the pump and tubing. The goal is to create a closed system where water is pumped from the lower pool back to the source.
Ensure the edges of the liner extend above the maximum water level and are concealed by rocks and soil to prevent leaks. Varying the depth and adding strategically placed rocks within the stream itself will create the pleasant sounds of moving water – ripples, gurgles, and small cascades.
Step 5: Maintenance for Lasting Beauty
A well-designed natural stream requires relatively low maintenance. Regularly remove fallen leaves and debris to prevent clogging the pump. Top off water levels as needed due to evaporation. Occasionally, you might need to thin out plants or adjust rocks. Check the pump intake periodically to ensure it’s clear. A properly balanced ecosystem with plants and beneficial bacteria will help keep the water clear naturally.
Embrace the Tranquility
Creating a backyard stream is a rewarding project that adds immense beauty, sound, and life to your garden. By carefully selecting natural materials like varied river rocks and gravel, incorporating lush plantings like grasses and shrubs, and designing a gently meandering path, you can replicate the peaceful ambiance seen in the image. It’s more than just a water feature; it’s an invitation to slow down, relax, and connect with nature right in your own backyard.