Transforming your garden into a vibrant, personalized sanctuary doesn’t always require a massive overhaul or a hefty budget. Sometimes, the most impactful changes come from simple, creative DIY projects that add character and charm.
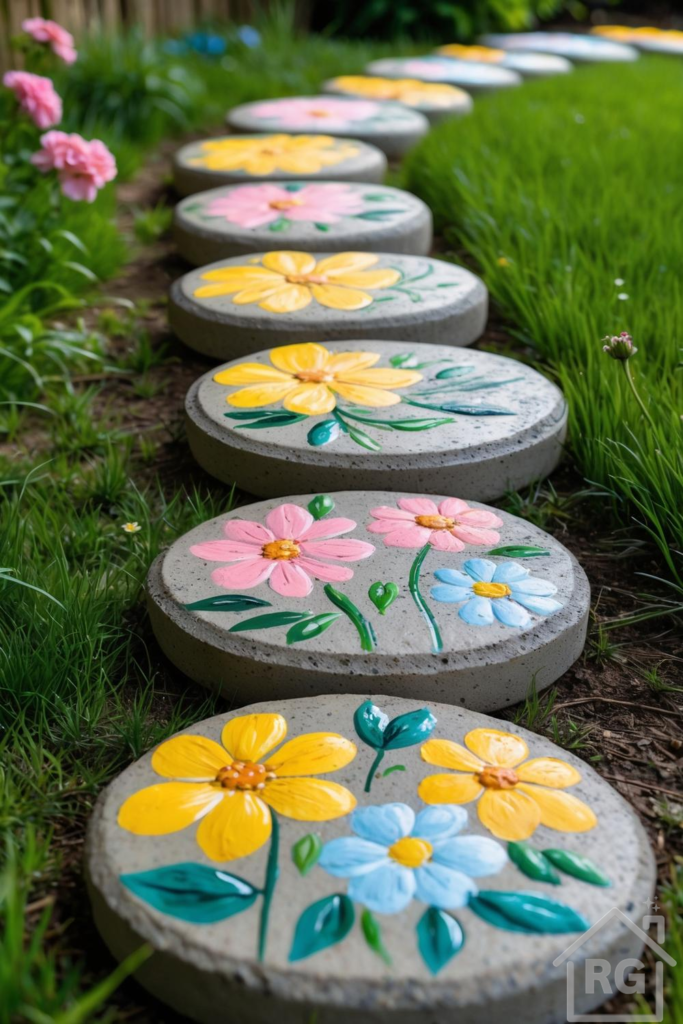
One such project is creating a whimsical garden path using hand-painted stepping stones. This approach not only adds a burst of color and artistic flair but also guides visitors through your outdoor space with a touch of playful elegance.
Why Choose DIY Painted Stepping Stones?
The beauty of DIY painted stepping stones lies in their versatility and the personal touch they bring. Unlike generic pavers, these stones become unique pieces of art, reflecting your style and creativity. Here’s why they’re a fantastic addition to any garden:
- Personalization: You have complete control over the design, colors, and patterns, allowing you to match them to your garden’s theme or your home’s aesthetic.
- Cost-Effective: While pre-made decorative stones can be expensive, painting your own concrete pavers is a budget-friendly way to achieve a high-end look.
- Creative Outlet: It’s a fun and relaxing activity that allows you to express your artistic side, whether you’re a seasoned painter or a beginner.
- Enhanced Curb Appeal: A charming path instantly elevates the visual appeal of your garden, making it more inviting and memorable.
- Durability: With the right materials and sealing techniques, your painted stones can withstand the elements for years to come.
Gathering Your Materials: What You’ll Need
Before you unleash your inner artist, ensure you have all the necessary supplies. Quality materials are key to a long-lasting and beautiful result.
- Stepping Stones:
- Pre-made Concrete Pavers: These are readily available at home improvement stores. Look for plain, unsealed concrete rounds or squares.
- DIY Concrete Molds: If you’re feeling ambitious, you can pour your own concrete stones using molds. This offers more control over shape and size.
- Paints: This is crucial for durability. Do NOT use standard craft acrylics unless specifically labeled for outdoor use.
- Outdoor Acrylic Paints: These are formulated to resist fading, cracking, and peeling due to weather exposure.
- Masonry Paint: Designed for concrete and brick, offering excellent adhesion and weather resistance.
- Multi-Surface Outdoor Paints: Versatile paints that adhere well to various outdoor materials.
- Colors: Choose a vibrant palette that complements your garden. In our example, bright yellows, soft pinks, and serene blues are used, contrasted with rich greens for foliage.
- Brushes: A variety of sizes will be helpful for different details – larger flat brushes for base coats, smaller round brushes for intricate designs, and fine-tipped brushes for outlines.
- Sealant: This is non-negotiable for protecting your artwork.
- Clear, Weather-Resistant, UV-Protective Sealer: Look for products specifically designed for concrete or masonry, often available in spray or brush-on forms. A matte or satin finish is usually preferred to avoid an overly glossy look.
- Cleaning Supplies: Stiff brush, soap, water, and rags for preparing the stones.
- Optional Tools:
- Sandpaper: Fine-grit sandpaper (120-220 grit) for smoothing rough spots on the stones.
- Stencils: If you prefer a more uniform design or are less confident in freehand painting.
- Pencil or Chalk: For sketching designs before painting.
- Drop Cloths or Newspaper: To protect your work surface.
Step-by-Step Guide to Painting Your Stepping Stones
Follow these steps to ensure your painted stepping stones are not only beautiful but also built to last.
1. Prepare Your Stones
- Clean Thoroughly: Use a stiff brush, soap, and water to scrub off any dirt, grime, or loose particles from the stones. Rinse them well and allow them to dry completely. Any moisture or debris can prevent the paint from adhering properly.
- Smooth Surfaces (Optional): If your stones have very rough patches, you can lightly sand them with fine-grit sandpaper (120-220 grit) for a smoother painting surface. Wipe off any dust afterward.
- Prime (If Recommended): Some outdoor paints or very porous concrete might benefit from a coat of concrete primer. Check your paint manufacturer’s recommendations.
2. Sketch Your Design
- Before applying paint, use a pencil or chalk to lightly sketch your desired design onto the dry stone. This allows you to refine your composition and correct mistakes before committing with paint. For floral designs, start with basic shapes for petals and leaves.
3. Apply Your Base Coats
- Begin with the largest areas of color. For the flowers, apply a solid base coat of yellow, pink, or light blue. For leaves and stems, use various shades of green. Allow each color to dry completely before applying the next, especially if colors are adjacent to prevent bleeding. Multiple thin coats are always better than one thick coat, as they dry more evenly and are less prone to cracking.
4. Add Details and Layers
- Once the base colors are dry, add details. This could include darker shades for shadows, lighter shades for highlights, or contrasting colors for flower centers. Notice the simple yet effective layering of colors to give them depth.
- Allow all paint to dry thoroughly. This might take 24-48 hours, depending on humidity and paint type. Rushing this step can lead to smudging or issues with the sealant.
5. Seal for Protection
- This is the most critical step for longevity. Once the paint is completely dry and cured, apply several thin coats of your chosen clear, weather-resistant, UV-protective sealant. Follow the manufacturer’s instructions regarding application method (spray or brush-on) and drying times between coats.
- Ensure the entire painted surface, and ideally the top and sides of the stone, are covered. This sealant will protect your beautiful artwork from rain, sun, foot traffic, and temperature fluctuations.
- Allow the sealant to cure fully before placing the stones in your garden. This can take several days.
Integrating Your Path into the Garden Landscape
Once your painted stones are ready, it’s time to lay them out and create your charming garden path.
1. Plan Your Path Layout
- Path Placement: Decide where your path will lead. Will it be a straight line to a garden bench, a winding trail through flower beds, or a practical shortcut? Lay out your stones on the grass or soil to visualize the path before digging.
- Spacing: Consider the natural stride of a person. Typically, stepping stones are spaced about 18-24 inches (45-60 cm) apart from center to center, but adjust this to feel comfortable for you and your family.
2. Prepare the Ground
- Mark Out: Once you’re happy with the layout, use a spade or trowel to mark the outline of each stone on the ground.
- Excavate: Dig out a shallow depression for each stone, just deep enough so that the top of the stone will be flush with or slightly above the surrounding ground level. This prevents tripping hazards and allows lawnmowers to pass over them easily.
- Leveling: Add a thin layer of sand or gravel to the bottom of each depression. This provides a stable, level base and helps with drainage. Use a level to ensure each stone is flat and even.
- Weed Barrier (Optional): For extra weed control, you can place a piece of landscape fabric under the sand/gravel layer.
3. Place Your Stepping Stones
- Carefully place each painted stone into its prepared spot. Wiggle it slightly to settle it into the sand/gravel base.
- Check for Stability: Ensure each stone is firm and doesn’t rock. If it does, lift it, adjust the base, and re-seat it.
- Fill Around the Stones: Once all stones are in place, backfill around them with soil, grass, or decorative gravel, gently tamping it down to secure them.
Complementary Landscaping and Plantings
To truly bring your garden path to life, surround it with plants that enhance its beauty and integrate it seamlessly into your outdoor space.
1. Groundcover Between Stones
While grass is a classic choice, consider low-growing groundcovers for a softer, more integrated look between your stepping stones:
- Creeping Thyme: Fragrant, low-maintenance, and tolerant of light foot traffic. Available in various shades of green and produces tiny flowers.
- Sedum (Stonecrop): Many low-growing varieties offer interesting textures and colors, often drought-tolerant.
- Moss: Ideal for shady, moist areas, creating a lush, ancient feel.
- Dichondra: A fast-growing groundcover with small, round leaves, perfect for a lush green carpet.
2. Border Plants and Edging
Frame your path with plants that complement the painted designs and add depth to your garden:
- Low-Growing Perennials:
- Dianthus (Pinks): These produce charming pink, red, or white flowers with a spicy fragrance. They are relatively low-maintenance and come in various heights.
- Creeping Phlox: Creates a carpet of vibrant flowers in spring, perfect for sunny spots.
- Alyssum: Delicate, sweet-smelling flowers that spill over edges, available in white, purple, and pink.
- Lavender: Fragrant and beautiful, attracting pollinators. Requires full sun and good drainage.
- Annuals for Continuous Color: Petunias, impatiens (for shade), marigolds, or zinnias can provide season-long blooms that echo the colors on your stones.
- Foliage Plants: Consider plants with interesting leaf textures or colors, even if they don’t flower prominently. Hostas (for shade), ferns, or ornamental grasses can add structure and contrast.
3. Integrating Color Palette
Think about the colors you used on your stones and try to echo them in your plant choices. If you have yellow flowers on your stones, plant some yellow coreopsis or black-eyed Susans nearby. Pink painted flowers can be complemented by pink petunias, roses, or dianthus. Blue painted elements can be mirrored by blue fescue grass, delphiniums, or hydrangeas (depending on climate and soil pH).
4. Climate and Soil Considerations
Always choose plants that are suitable for your local climate zone (USDA Hardiness Zone) and soil conditions. Consider sun exposure, drainage, and water requirements. For a low-maintenance path, opt for drought-tolerant plants if you live in a dry region, or moisture-loving plants if your garden tends to be damp. Group plants with similar needs together.
Creating Ambiance and Finishing Touches
A garden path is more than just a way to get from one point to another; it’s an experience. Enhance the ambiance around your painted stepping stone path with thoughtful additions.
- Lighting:
- Solar Path Lights: Easy to install and provide soft illumination along the path, making it safe and inviting after dusk.
- String Lights: Drape them overhead if there are nearby trees or structures, creating a magical, festive atmosphere.
- Spotlights: Highlight specific plants or features along the path.
- Garden Decor:
- Small Statues or Figurines: Tuck whimsical gnomes, fairies, or animal statues among the plants.
- Bird Baths or Feeders: Attract local wildlife, adding sound and movement to your garden.
- Wind Chimes: Introduce gentle, soothing sounds.
- Garden Art: Incorporate other DIY elements like painted rocks, mosaic stepping stones, or upcycled decor.
- Seating: If your path leads to a quiet corner, consider adding a small bench, a pair of Adirondack chairs, or a bistro set. This provides a spot to pause, relax, and enjoy the beauty of your personalized garden.
Maintenance and Longevity of Your Painted Path
To keep your painted stepping stones looking fresh and vibrant for years, a little maintenance goes a long way.
- Regular Cleaning: Periodically wipe down the painted surfaces with a soft cloth and mild soap and water to remove dirt and grime. Avoid abrasive cleaners or harsh scrubbing, which can damage the paint or sealant.
- Re-sealing: Depending on sun exposure and foot traffic, you may need to reapply a fresh coat of sealant every 1-3 years. Look for signs of dullness, chipping, or fading as indicators. A quick re-seal can significantly extend the life of your artwork.
- Weed Control: Keep weeds from growing between and around your stones. Regular weeding or applying a pre-emergent herbicide can help maintain the neat appearance of your path.
- Winterizing (in cold climates): In areas with harsh winters, consider covering your painted stones with a tarp or moving them to a sheltered location if they are easily movable. While outdoor paints and sealants are designed to withstand freezing temperatures, extreme conditions can still take a toll over many years.
Troubleshooting Common Issues
- Paint Chipping or Peeling: This often indicates improper surface preparation (stones weren’t clean or dry), insufficient primer, or using the wrong type of paint. Sand the affected area, clean, and reapply outdoor-grade paint and sealant.
- Fading Colors: Usually a sign of inadequate UV protection from the sealant. Reapply a high-quality UV-resistant sealant.
- Moss or Algae Growth: Common in damp, shady areas. Clean with a diluted bleach solution or a specialized outdoor cleaner, then rinse thoroughly. Ensure good drainage around the stones.
Creating a garden path with DIY painted stepping stones is a rewarding project that adds immense character and joy to your outdoor space. It’s an invitation to slow down, appreciate the details, and enjoy the beauty you’ve personally crafted.
By following these guidelines for materials, painting techniques, and integration into your landscape, you can create a durable, delightful, and truly unique pathway that will be admired for seasons to come. So, gather your supplies, unleash your creativity, and step into a more colorful garden!